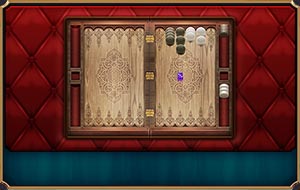
Backgammon rulesObjectiveThe objective is for players to remove (bear off) all their checkers from the board before their opponent can do the same. As the playing time for each individual game is short, it is often played in matches where victory is awarded to the first player to reach a certain number of points. SetupEach side of the board has a track of 12 long triangles, called points. The points form a continuous track in the shape of a horseshoe, and are numbered from 1 to 24. In the most commonly used setup, each player begins with fifteen chips, two are placed on their 24-point, three on their 8-point, and five each on their 13-point and their 6-point. The two players move their chips in opposing directions, from the 24-point towards the 1-point. Points 1 through 6 are called the home board or inner board, and points 7 through 12 are called the outer board. The 7-point is referred to as the bar point, and the 13-point as the midpoint. MovementTo start the game, each player rolls one die, and the player with the higher number moves first using the numbers shown on both dice. If the players roll the same number, they must roll again. Both dice must land completely flat on the right-hand side of the gameboard. The players then take alternate turns, rolling two dice at the beginning of each turn. After rolling the dice, players must, if possible, move their checkers according to the number shown on each die. For example, if the player rolls a 6 and a 3 (denoted as “6-3”), the player must move one checker six points forward, and another or the same checker three points forward. The same checker may be moved twice, as long as the two moves can be made separately and legally: six and then three, or three and then six. If a player rolls two of the same number, called doubles, that player must play each die twice. For example, a roll of 5-5 allows the player to make four moves of five spaces each. On any roll, a player must move according to the numbers on both dice if it is at all possible to do so. If one or both numbers do not allow a legal move, the player forfeits that portion of the roll and his or her turn ends. If moves can be made according to either one die or the other, but not both, the higher number must be used. If one die is unable to be moved, but such a move is made possible by the moving of the other die, that move is compulsory. In the course of a move, a checker may land on any point that is unoccupied or is occupied by one or more of the player’s own checkers. It may also land on a point occupied by exactly one opposing checker, or “blot”. In this case, the blot has been “hit”, and is placed in the middle of the board on the bar that divides the two sides of the playing surface. A checker may never land on a point occupied by two or more opposing checkers; thus, no point is ever occupied by checkers from both players simultaneously. There is no limit to the number of checkers that can occupy a point at any given time. Checkers placed on the bar must re-enter the game through the opponent’s home board before any other move can be made. A roll of 1 allows the checker to enter on the 24-point (opponent’s 1), a roll of 2 on the 23-point (opponent’s 2), and so forth, up to a roll of 6 allowing entry on the 19-point (opponent’s 6). Checkers may not enter on a point occupied by two or more opposing checkers. Checkers can enter on unoccupied points, or on points occupied by a single opposing checker; in the latter case, the single checker is hit and placed on the bar. More than one checker can be on the bar at a time. A player may not move any other checkers until all checkers on the bar belonging to that player have re-entered the board. If a player has checkers on the bar, but rolls a combination that does not allow any of those checkers to re-enter, the player does not move. If the opponent’s home board is completely “closed” (i.e. all six points are each occupied by two or more checkers), there is no roll that will allow a player to enter a checker from the bar, and that player stops rolling and playing until at least one point becomes open (occupied by one or zero checkers) due to the opponent’s moves. Bearing offWhen all of a player’s checkers are in that player’s home board, that player may start removing them; this is called “bearing off”. A roll of 1 may be used to bear off a checker from the 1-point, a 2 from the 2-point, and so on. If all of a player’s checkers are on points lower than the number showing on a particular die, the player may use that die to bear off one checker from the highest occupied point. For example, if a player rolls a 6 and a 5, but has no checkers on the 6-point and two on the 5-point, then the 6 and the 5 must be used to bear off the two checkers from the 5-point. When bearing off, a player may also move a lower die roll before the higher even if that means the full value of the higher die is not fully utilized. For example, if a player has exactly one checker remaining on the 6-point, and rolls a 6 and a 1, the player may move the 6-point checker one place to the 5-point with the lower die roll of 1, and then bear that checker off the 5-point using the die roll of 6; this is sometimes useful tactically. As before, if there is a way to use all moves showing on the dice, by moving checkers within the home board or bearing them off, the player must do so. If a player’s checker is hit while in the process of bearing off, that player may not bear off any others until it has been re-entered into the game and moved into his/her home board, according to the normal movement rules. The first player to bear off all fifteen of his/her own checkers wins the game. If the opponent has not yet borne off any checkers when the game ends, the winner scores a gammon, which counts for double stakes. If the opponent has not yet borne off any checkers and has some on the bar or in the winner’s home board, the winner scores a backgammon, which counts for triple stakes. Doubling cubeTo speed up match play and to provide an added dimension for strategy, a doubling cube is usually used. The doubling cube is not a die to be rolled, but rather a marker with the numbers 2, 4, 8, 16, 32, and 64 inscribed on its sides, to denote the current stake. At the start of each game, the doubling cube is placed on the midpoint of the bar with the number 64 showing; the cube is then said to be “centered, on 1”. When the cube is centered, either player may start their turn by proposing that the game be played for twice the current stakes. Their opponent must either accept (“take”) the doubled stakes or resign (“drop”) the game immediately. Whenever a player accepts doubled stakes, the cube is placed on their side of the board with the corresponding power of two facing upward, to indicate that the right to re-double belongs exclusively to that player. If the opponent drops the doubled stakes, he or she loses the game at the current value of the doubling cube. For instance, if the cube showed the number 2 and a player wanted to redouble the stakes to put it at 4, the opponent choosing to drop the redouble would lose two, or twice the original stake. |

|
|||||||||||||||||||||||||
Nardgammon and Cookies
This site uses cookies. By clicking ACCEPT or continuing to browse the site, you consent to their use. More


ACCEPT